Why
Ever since early 2015, the most up to date Minecraft: Java Edition launcher has come with a built-in version of Java. This means that it is no longer needed to be installed on the computer beyond the version built-in with Minecraft.
This is good, as having the latest Java version is good for running the game efficiently and securely - see the wiki’s comment on this topic. Additionally, Java is often fraught with security issues, so it is often safer not to have it available for any program to use.
Unfortunately, a lot of Minecraft tools - especially modded tools, require access to a Java runtime for installation - this is needed for forge and optifine - e.g the optifine installer requires Java to be present to install optifine - which is by far the easiest method of installation, but there is no obvious way to do this without installing Java to your computer.
How
There is a way to make use of the built-in Java runtime, which is documented below.
The subpoints laid out under each point are windows specific - laying out every step, and are only confirmed to work for windows 10.
- Find the folder where the Minecraft launcher is located.
- Open the Minecraft launcher.
- Right-click the icon on the taskbar
- Right-click on the
Minecraft_stagingtext in the menu which comes up. - Left click on
properties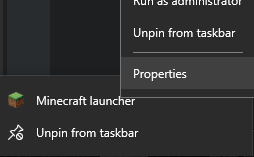
- Copy the contents of
Start into a new explorer window. E.g.C:\Users\<username>\Documents\Minecraft\Launcher - Find the built-in Java executable.
- From the folder you found in
1., navigate toruntime\jre-x64\1.8.0_51\bin - Ensure that the file
java.exeis in this folder. - Copy the link to the folder.
- Choose the folder that you want to run your installers from. (For me this is
C:\Users\Levertion\Documents\Minecraft\Mod Installation). - Create an executable file in this folder formed as follows:
For windows, create a file called 'install.bat' For mac/Linux create the equivalent file type - not sure how - sorry. Then: Paste in the folder path you copied earlier, then add '/java.exe' - For Windows, this must be surrounded by quotation marks Add ' -jar ' to the end of the file. Eg: For me, it is: "C:\Users\Daniel McNab\Documents\Minecraft stuff\Launcher\runtime\jre-x64\1.8.0_51\bin\java.exe" -jar - Running this:
- Download the mod installer
- Put it in the same folder as the script file.
- Then edit the script file so that the end of the file has the name of the installer file
Support
If you have any issues getting this to work, feel free to tweet me @LevertionMC with your issue - maybe use Pastebin to get around the limit.
Comments